Ecoyards provides complete lawn and landscape services with an emphasis on quality customer service and environmental responsibility.

Archive for March, 2012

Home energy audit in Seattle

March 30, 2012 @ 8:33 am

Seattle City Light CFLLooking for ways to cut down on our heating costs, we recently took advantage of a Seattle City Light home energy audit program for our 1952 West Seattle home. For $95 (the utility pays about $305), you can hire a home-energy auditor to come to your home, assess your energy performance, and give you tips on how to weatherize your home, make the building more energy efficient and reduce your carbon footprint. The program is open to all Seattle City Light customers living in single-family homes. 

Energy audit, West Seattle

Revolution Green Power energy auditor

When City Light first started doing energy audits, the audits were only available in certain neighborhoods at certain times, and the process seemed a bit more complicated than it is today. Now, the audits are available to anyone who wants one, and signing up couldn’t be simpler. Here’s how to do it.

1. Sign up by filling out the form on the city’s website. You’ll get an account and, if you qualify, a coupon code number. [TIP: If you live within Seattle city limits and think you’ll likely do some major energy updating, a program called Community Power Works offers rebates and low-interest community loans to pay for those upgrades. You can sign up with CPW and then get your energy audit completed; we went through the City Light website first and discovered, it’s OK, too, to sign up for the energy audit through the city’s website and then get into the CPW program later].

2. Once you have your coupon number, call up one of the city’s pre-qualified home energy auditors and arrange to get your audit done. We hired Revolution Green Power after reading Lisa Stiffler’s post on Sightline. All the contractors have to meet city requirements.

Energy Audit, West Seattle

Revolution Green Power auditor conduction blower door test

3. Schedule an audit. Two workers from Revolution Green Power came to our house, and began finding areas in the house where heat leaked out. We knew there would be plenty of places where heat could escape: through the insulated floors, chimney, even the quaint but seriously outdated mailbox slot. The crew closed all the doors to the house and installed a door blower that pulls the air out of the house, allowing them to find all the areas where air leaks out. They also gave us free compact fluorescent bulbs, courtesy of Seattle City Light, and changed out all bulbs where we hadn’t already done so. They told us that we should consider sealing our ducts, or consider switching from our grossly outdated oil furnace and get a ductless heat pump.

energy audit scorecard, west seattle


4. Get energy performance scorecard. Several days after the home visit, our detailed energy analysis was available for viewing online. The scorecard gives you an energy score, as well as what that means in terms energy costs. For us, that meant energy costs of $1,350/year. We fell well below the Seattle average in energy score and carbon score, mostly because the house is so small. The most important detail: with the recommended upgrades we could cut our energy score and costs by more than half.

5. Read energy analysis and decide on energy upgrades. More useful than the report card was the energy analysis that told us, in great detail, what was working and what wasn’t in terms of energy efficiency. It prioritized what we needed to do first that would get us the most bang for our buck and what it would cost. Armed with the report, we are now in the process of getting contractor bids on a couple of services, including insulating our floors/crawl space and installing a ductless heat pump. Some of the smaller stuff, like plugging holes, we’ll be adding to our weekend to-do lists.

Filed under Seattle Landscape Maintenance · No Comments »

Exploring the Early Learning Garden at Mercer Island Library

March 28, 2012 @ 12:58 pm
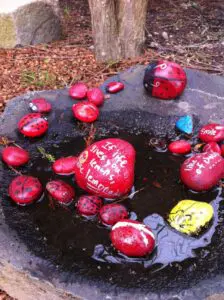
ladybug rocks, ecoyards, mercer island

Painted ladybug rocks, set on basalt column; all photos taken by Ecoyards

As parents of a rambunctious toddler, we’re always interested in getting our son outdoors to explore and learn. So we were excited to learn about the Mercer Island Public Library Early Learning Garden from our clients on Mercer Island. (Ecoyards frequently works with Mercer Island customers on design-and-build landscape projects; we also help many Mercer Island customers maintain their lawn and landscapes). The public library garden opened last fall, thanks to sweat and labor from hundreds of community volunteers.

The Mercer Island Library worked with the Pomegranate Center to build a unique outdoor space that connects kids with nature and literacy. The landscape design does a lot with a relatively small space that surrounds the library. A short trail starts at the parking lot and wraps around the west and north sides of the public library. It connects three gathering circles: basalt columns in the smallest, granite boulders next and cedar benches and stumps to sit on in the last and largest gathering circle.

cedar circle, mercer island, ecoyards

Cedar circle

The garden recognizes that literacy and life-long learning can go beyond books and reading. Young kids have a sense of wonder and imagination that can be cultivated early on, both indoors and outdoors. Alphabet tiles handmade by children and other volunteers are placed throughout the trail to help the library’s youngest patrons develop early literacy skills. The tiles illustrate animals and plants that can be found on Mercer Island, such as B for butterfly and J for jay.

Maple pavers, mercer island, ecoyards

M for Maple

The paths are filled with empty hazelnut shells (yes, they come from Washington), and make for a fun crunching sound under feet.

Child walks on path full of hazelnut shells.

There’s a lot for gardeners to love as well. Northwest native plants such as rhododendrons, ferns and Oregon grape.

Rhododendron, Mercer Island

Rhododendron

Filed under Seattle Landscape Design, Seattle Lawn Care, Vegetable Gardening · No Comments »

Evergreen Huckleberry – one of our favorite Northwest native plants

March 21, 2012 @ 10:10 am

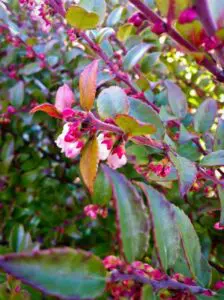
Hands down, one of our favorite Northwest native plant is the evergreen huckleberry. Vaccinium ovatum is an edible plant unique to the Northwest, and also a Great Plant Pick for Seattle landscapes. It has beautiful foliage (leaves with a tinge of deep waxy green and red when mature) and purple-black berries in the fall. This plant is a must in any Seattle garden because it tolerates a wide range of light levels, from full sun to shady woodland environments, and provides year-round interest. Evergreen huckleberry is fairly disease-resistant and drought-tolerant; once established, it require little pruning or water (though a bit of water during dry weather can help flowering and fruit production).

Evergreen Huckleberry, West Seattle, Ecoyards, Vaccinium Ovatum, Landscaping

Evergreen Huckleberry, West Seattle

The erect shrubs can grow tall; some of our clients on Mercer Island have older, bushy shrubs that are about 6-feet tall. The berries ripen during the late summer to fall; they’re slightly tart, about one-third the size of a typical blueberry and make great jams or jellies. My son is crazy about them and loves to eat them right off the plant, his fingers and lips stained red-purple by the juices. Add huckleberries to muffins or pancakes; they’re also easy to freeze. One of our clients, Lisa in Ballard, makes a killer huckleberry pie, filled with berries she picks from her garden.


Filed under Seattle Landscape Design · No Comments »

Sprinkler over-spray

March 15, 2012 @ 9:16 pm
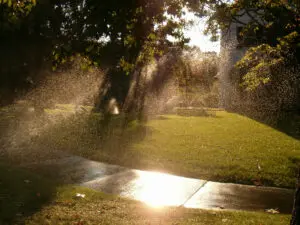
sprinkler over-sprat seattle

Sprinkler over-spray; photo by jellaluna via Creative Commons license

Ever walk by a sprinkler system where everything but the plants are getting irrigated? The sprinkler unintentionally sprays water all over the sidewalk, pavement or building, rather than directing the water to the base of the plants. That’s over-spray, and there are many ways to fix it if you have a sprinkler system.

The first thing to do is to make sure the sprinkler nozzles are clean, properly aligned, and pointed in the right direction. Sprinklers can become misaligned over time as parts vibrate during operation, or get bumped by mowers and foot traffic.

Sometimes, over-spray is just a result of an improperly designed system. Sprinkler heads may be positioned in poor locations or incorrect sprinkler nozzles may be installed.  Variable arc nozzles are available for those spaces with unusual angles of sprinkler coverage, but care must be taken to match the precipitation rates with other sprinklers on the zone to ensure proper distribution uniformity.  Some sprinklers may need to be relocated, or, in some cases, simply removed and capped.

Converting shrub and planting beds to drip irrigation will eliminate over-spray in those areas because it delivers water directly to a plant’s root zone.  Drip irrigation is efficient and will help you save water, and ultimately lower your water bills. In fact, it’s so efficient that many cities that put restrictions on home watering use during droughts often exempt drip irrigation. You’re able to water the plant’s roots, rather than spraying its leaves, foliage and branches, and you’re also able to water the plants more deeply because the drip system releases water more slowly than a sprinkler or spray.

If you have an existing sprinkler system that needs a tune up or you want to convert sprinkler zones to drip, contact us at Ecoyards.

Filed under Seattle Irrigation Services, Seattle Landscape Maintenance · No Comments »

Gardening with kids in Seattle

March 13, 2012 @ 8:56 pm

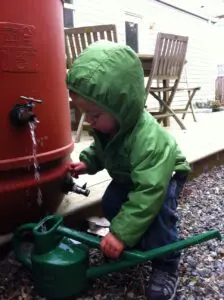
Getting water from the rain barrel

My toddler son loves to dig around in the yard, so I decided to put him to work a few weeks ago when I needed to weed our landscape beds after a winter of neglect. After watching me dig up a few weeds in our raised beds, he grabbed his little metal shovel and began copying me. He put the shovel into the ground, pushed it down with his feet, and then hauled up a few weeds — which he promptly dumped, along with a scoopful of good dirt, into the gravel walkway. Oh, well. At least he was having fun digging. I gave him an empty bucket, and he spent the next 20 minutes filling it with compost.

There are different ways, large and small, to get your toddler or older kids interested in gardening or being outside. Toddlers love to imitate, so you don’t have to have a planned activity to get them excited about gardening. If you pull weeds, ask them to help you put them in the yard waste bin. Find worms together, and show your kids how to handle the insects gently. Look for birds in your trees. Smell different plants in your garden.

Here are some other ideas to get your toddlers out in the garden:

Visit children’s gardens and let your kids explore. The Bradner Gardens Park, Magnuson Children’s Garden, and Good Shepherd Children’s Garden are some of our favorites.

Sign up for a children’s gardening class, if your school doesn’t already offer gardening in the classroom. Seattle Tilth has a 2012 Summer Garden Camp for kids 1-14 in Rainier Beach and North Seattle neighborhoods. One day sessions for young tots including “Don’t Squish that Bug” and “Wiggle, Squiggle, Giggle.” Other classes teach about ladybugs, let your toddlers plant seeds, and explore other creatures.

Keep your kids safe. Supervise young ones when they’re using tools or planting seeds that could be potential choking hazards. Keep fertilizers out of their reach. Avoid using pesticides! If you’re concerned that your soil may have lead or arsenic, get it tested; King County explains how you can do that.

Get your kids good-quality tools that fit small hands, rather than having them wrestle with adult-sized tools. Practice safe handling of those tools, and teach them how to put tools away. My son has a blue metal shovel, a yellow hoe, and a bamboo shrub rake. Each cost between $5 and $10. We bought all three at the West Seattle Junction True Value Hardware store; check your local hardware store. 

Plant a garden, but keep it simple. Pick a few vegetables that are easy to grow, that grow fast, and are visually cool. Sugar snap peas or snow peas come to mind; the seeds are easy to handle for small hands. Radishes and lettuce also are great for the impatient toddler. Plant root vegetables that are fun to dig up, such as potatoes. Plant weird stuff, like purple carrots.

Later in the summer, let toddlers help you harvest tomatoes, carrots and snap peas, or pick raspberries and huckleberries (though teach your kids to only eat foods after asking for permission). Get a small watering can or spray bottle, and let them water your plants. My son likes to fill up the watering can at the rain barrel, and water our potted plants.

Grow seeds indoors. Kidsgardening.org has some great articles that caregivers can do with their young ones, including planting a windowsill herb garden, gardening with creative containers, or garbage-can gardening.

Read books about gardens and bugs. The National Gardening Association came up with this list of gardening books to read with your toddler: Growing Vegetable Soup by Lois Ehlert; Pumpkin Pumpkin by Jeanne Titherington; Tops and Bottoms by Janet Stevens; This is the Sunflower by Lola M. Schaefer; Whose Garden Is It? by Mary Ann Hoberman; The Carrot Seed by Ruth Krauss; The Tiny Seed by Eric Carle; Oliver’s Vegetables by Vivian French; Stone Soup by Marcia Brown; Alison’s Zinnia by Anita Lobel.

Visit farmers markets throughout the year and talk to your kids about what’s fresh at the market and growing in gardens. Visit farms where toddlers can pick their own strawberries, blueberries, pumpkins, and so on.

Check out this National Wildlife Federation guide for other helpful tips.

Find more lessons or activities at the KidsGardening website.

Filed under Seattle Landscape Maintenance, Vegetable Gardening · No Comments »

5 must-have tools for the garden

March 11, 2012 @ 8:46 pm

Here are some of our favorite tools of the trade at Ecoyards:

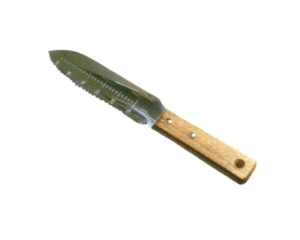
1. Japanese hori-hori digging knife (left). This stainless steel knife is an indispensable tool for any gardener. At about $30, it’s pricier than your standard trowel, but it serves so many purposes that it’s worth it the money. The serrated teeth on one side is great for slicing tough roots, slicing off spent perennials, prying weeds and digging through compacted soil. The wooden handle is sturdy, and fits perfectly in your hand. It also comes with a black sheath that can attach to a belt. We buy ours in West Seattle at the True Value Hardware store

2. Felco #2 Pruners. $45 (right). This is hands-down the best pair of pruners you can have. This bypass pruner is one of the most recommended among gardeners for its strength, versatility and comfort. Any good hardware store or garden store will stock these pruners and replacement parts.

3.  Plant tape, about $1-$2 for a 150-foot roll (left). There are a lot of choice out there when it comes to tying plants, including twine, plant tape/ribbon, wire, or velcro. We prefer plant tape because it’s cheap, has many uses and is stretchy, so it doesn’t girdle a tree – unlike wire or twine. We like them for tying vines to trellises, staking tomato plants, mending branches, and supporting weak branches.

4.  Folding pruning saw, between $10-$25. This handy fine-tooth pruning saw folds up and fits in your back pocket for easy access. It works great for light and medium pruning jobs. Get one with an ergonomic fit, and rubberized handle for better grip and comfort.

5. Landscape irrigation and remote, about $300. Ok – this is mostly for professionals only, but let us geek out for a moment and suggest this high-tech gizmo as a must-have for those who spend a lot of time fine tuning irrigation systems. The price, alone, sets it apart from the other items on this list, but it’s no less essential for the serious gardener. This Rainbird remote lets you turn on your sprinkler system from anywhere in your yard; when you need to adjust your sprinkler in one corner of your yard, you can use this remote control to do it rather than having to walk back to the central controller.

Filed under Seattle Landscape Maintenance · No Comments »

All about tulips – hardy bulbs that area easy to grow in Seattle

March 9, 2012 @ 12:06 pm
tulips, seattle, snow, ecoyards, landscape maintenance

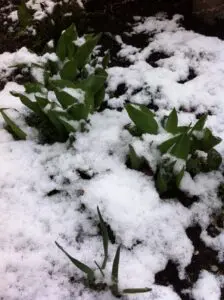
Tulips peeking through recent snow

Despite the snow in the Seattle recently, there are still signs of spring everywhere. Forsythia branches are showing their signature yellow color; flowering currants and magnolias are starting to bloom; and the most enjoyable, distinctive sign of spring – tulips – are emerging after a winter spent growing underground.

Tulips are native to central Asia and were first commercially cultivated as early as 1000 AD by the Turks, long before a botanist named Carlos Clusius widely introduced them to the Netherlands during the late 16th century. Tulips are now synonymous with the Netherlands, and regionally, with the Skagit Valley, where visitors can catch thousands of tulips blooming during the spring Tulip Festival (April 1-30, 2012).

Tulips are hardy bulbs and easy to grow in the Seattle area. They can withstand cold snaps without much problem; so no need to worry about the recent snowfall. Plant tulips and other spring-blooming bulbs, such as daffodils, in the fall so they can bloom in the spring. For the showiest blooms, buy the biggest bulbs and buy them as soon as you start seeing them in the garden store (avoid ones with roots growing from them). Tulips require a good dose of sun — about 5 to 6 hours a day — and well-drained soil. Plant them a few inches deeper than the packet instructions tell you, about 10 inches or so.

tulips, seattle, landscape maintenance

Ecoyards’ youngest employee with tulips, planted two years ago.

In the Ecoyards garden, our tulips are starting to peak out of the ground (pictured above) in early March. Some people plant tulips yearly for the best blooms and show, but most high-quality tulip bulbs will continue to bloom for three years with good results if you put them in a sunny spot with good drainage. (Check your bulb variety; some very showy blooms are sold as annuals and are only meant to bloom for one season). From year to year, tulips split into smaller bulbs, and eventually those smaller bulbs may not produce a flower. The tulips pictured here were planted about three seasons ago, so we will probably divide the bulbs later this fall or plant new ones.

Now is probably a good time give your bulbs a bit of fertilizer. You should fertilize as foliage (about an inch or two) emerges and again after flowering (there’s no need to fertilize if you’re treating the tulips as an annual, or good for one season). If you want to cut the flowers for indoor use, do it when it’s just past the tight bud stage. Cut it in the morning, put the stems in lots of water and store in a cool area.

Once a tulip has bloomed, remove the dead flower so it doesn’t set seed, which can reduce bulb growth. But resist the urge to pluck the leaves. Let the leaves get good and brown before removing them. The foliage is working hard to photosynthesize nutrients and to recharge the bulb so it can send up a healthy flower stalk next spring. Once the leaves are withered and brown, cut them back and leave the bulbs in the ground for next spring’s bloom.


Filed under Seattle Landscape Design, Seattle Landscape Maintenance · No Comments »

Choosing the right patio material

March 7, 2012 @ 11:59 am
Old Dominion, paver patio, seattle

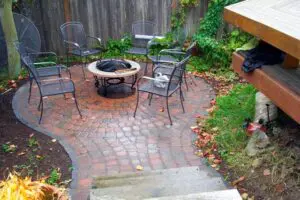
Old Dominion circular paver, Ecoyards

Patios can extend your outdoor living space, give structure to your landscape, and provide a great place to hang out. There are many decisions that go into installing a patio. Once you have a design in mind, deciding what material to use can be tough. Initial cost of installation is only one of numerous factors. You also should include durability, maintenance over time, and how the patio will be used (for example, pea gravel may be great in the side yard, but not an ideal surface for patio table and chairs).

Here’s a brief summary of some of the materials that can be used:

Bricks can give you a traditional, classic beauty that will hold their natural clay hue over time. We have helped our clients incorporate some “reclaimed” bricks from other old projects into their new projects, giving the patio an aged look; you may not always be able to find reclaimed bricks.

Poured concrete is simple, smooth, and among the cheapest options for patios or walkways. One of the disadvantages is that they can crack over time. Proper installation (including pouring concrete over a thick compacted base of sand or gravel) can help prevent cracking, but if your house is in an area where soil settles over time or the earth beneath shifts, cracking can still happen. Concrete also is impervious, so water runs off the surface rather than seep into the soil or gravel below.

seattle, flagstone, slate, ecoyards, patio

Natural stone (slate) walkway

Natural stone is attractive, durable, requires little maintenance but it is among the most expensive materials for patios. Bluestone with its distinctive smooth surface and blue-tan hues are ideal for formal landscapes. Flagstone (such as slate or limestone) lend a formal feel to a landscape, but also can be laid randomly to give a less formal feel. Natural stone is durable, slip-resistant, and can be installed so that moss or other groundcovers can be planted in between the spacing, allowing rain to seep through and adding a living feature to your patio. We typically install flagstones over a base of sand and gravel, though clients can choose to mortar flagstones on top of a concrete slab.

Pavers made from pre-cast concrete are the most popular choice for Ecoyards clients. These pavers range in size, color, and texture, giving homeowners numerous design options. Pavers can be installed over a concrete slab or a compacted base of sand and gravel. Once installed, pavers require very little maintenance. Recycled pavers such as those offered by VAST are made of 95 percent post-consumer recycled materials –plastic bottles and scrap tires — rather than traditional concrete or clay.

Permeable pavers are becoming increasingly popular choices as a way to help control stormwater pollution, but they are generally more expensive. Many cities and counties are using permeable pavers, such as Eco-Priora, interlocking concrete pavers, as a more effective method of controlling stormwater (all the stuff that washes into storm drains when it rains) in big projects.

Contact Ecoyards to setup a consultation if you’d like help designing a patio space in your garden.


Filed under Seattle Hardscaping, Seattle Landscape Design · No Comments »

Oxalis oregana – our own native shamrock

March 6, 2012 @ 10:25 am

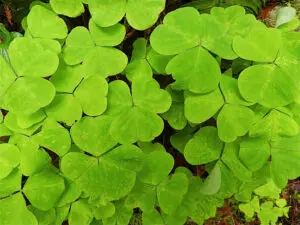
Northwest native shamrock-like Oxalis oregana; photo by nordique via Creative Commons License

With St. Patrick’s Day approaching, we thought it would be a good time to highlight a beautiful Northwest native plant that resembles a shamrock. Oxalis oregana, or redwood sorrel or Oregon oxalis, is a small herbaceous perennial that blooms from early spring through summer. They’re native to the U.S. West Coast, from British Columbia south to California. In Washington state, you may encounter them as thick, lush carpets of green in coastal forests, such as those in the Olympic National Park.

Oxalis oregana has three shamrock-like heart-shaped leaflets, with a deep green color. The plants, however, most commonly portrayed as shamrocks are: Oxalis acetosella (wood sorrel), Trifolium repens (white clover), or Medicago lupulina (black medic), or Trifolium minus (hop clover).

Our native redwood sorrel spreads by creeping rhizomes (through horizontal rootstalks), and can spread quickly once established. It’s well-suited for partial shade or deep shade areas;   blooms in spring bearing white or pink flowers about an inch wide; and dies back in the winter in cold areas.


Filed under Seattle Landscape Design, Seattle Landscape Maintenance · No Comments »

Common mistakes people make when planting landscape plants

March 3, 2012 @ 9:19 am

When we renovate landscapes, we often find basic errors people make when they install new plants. Planting is one of the most important steps to helping a shrub, tree or other plant grow.

Here are some of the common mistakes we see:

Mistake #1: Planting in poorly-drained soil. This is a kiss of death for many plants, though not all. Some plants can tolerate “wet feet” better than others (such as rhododendrons and azaleas), but most require well-drained and well-aerated soil to get off to a good start. Plants that have been installed in soil that doesn’t drain well will have a hard time surviving in your landscape, no matter how much TLC you give them. How do you know that the soil drains well? The soil should drain quickly, about 1/2 inch or 1 inch of water an hour. If you’ve got hard, compacted clay soil, like many areas of Seattle, it may be better to install the plant in a raised bed or mound. The raised bed or berm should be at least 8 inches high and at least 4-feet wide for a shrub or 8 feet wide for small ornamental trees.

Mistake #2: Digging a hole that’s too shallow, too wide or too deep. When you plant, dig a hole that is only deep enough for the top of the root ball to be at or slightly higher than the soil line. The width of the hole should be two or three times the diameter of the root ball. For large, bare-root, balled, or burlaped plants, make the hole at least one foot wider than the diameter of the root ball.

Flickr photo by cbb4104 via Creative Commons License

Mistake #3: Not taking care of roots before you install in the planting hole. Many plants that you buy at the nursery are grown in containers, and their roots often grow long and in a circle. If you put the plant into the ground without spreading out the roots, its roots will keep growing in a circle, making it harder for nutrients and water to get from the roots to the plant’s leaves and stems. It’ll also make it harder for the plant to anchor itself. Make sure you pull out the roots and spread them. If the roots are fibrous and soft, this can be done easily by crumbling some of the soil. If the plant or tree is root-bound, remove the root ball from the container and slice it through with a sharp knife or pruning shears; from top to bottom at least four different locations. Spread the circling roots out, and make sure they contact some of the backfill soil. Make sure you plant the tree immediately.

Mistake #4: Adding compost, fertilizer, or any organic amendment to fill in your planting hole. Research has show that adding organic amendments in backfill when you plant isn’t beneficial compared to using the native soil you removed. Compost is usually beneficial, but when used in the planting hole it could increase the risk that the shrub, tree or plant will lean or sink. Doing so also will encourage the roots to remain in the planting hole rather than spreading out into the surrounding soil. It’s best to incorporate compost or other organic matter uniformly throughout the plant’s root zone rather than placing it in the planting hole.

Please contact Ecoyards if you’d like help installing new plants in your garden.


Filed under Seattle Landscape Maintenance · No Comments »