Ecoyards provides complete lawn and landscape services with an emphasis on quality customer service and environmental responsibility.

West Seattle garden tour

Posted on July 13th, 2009 by Phuong

If you’re looking for some ideas on how to transform your yard into a logospectacular garden, mark July 19 on your calendar. This is the date of the 15th West Seattle Garden Tour. Eight residential homes will be open to the public for viewing. Tickets are on sale for $15.

You can preview some of the homes online, including “Chez Hugh the Yew” which makes fabulous use of low-maintenance, drough-tolerant plants for year-round interest.

Ciscoe Morris will be lecturing from noon to 1 p.m. at the Kenney Retirement Home. Cost is $10, though children 12 and under are free.

Filed under: Seattle Landscape Design,Seattle Landscape Maintenance,Seattle Lawn Care | | No Comments

The powdery mildew problem

Posted on June 23rd, 2009 by Phuong

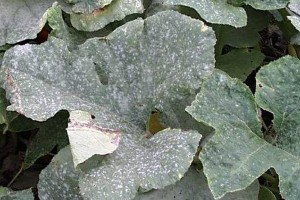
Have you noticed white powdery appearance on leaves and other green parts of your plants? powdery mildewIt’s likely powdery mildew fungus, a common disease that can be found on squashes, roses, dahlias, cucumbers, pumpkins, azaleas, dogwoods and many more plants. The fungus often causes leaves to wilt, turn yellow, drop from the plant or curl up. The fungus thrives in moderate temperatures and high humidity, and tends to favor plants in shady, overcrowded areas.

On roses, you’ll find the powdery white growth on leaves, stems, buds or flowers. It typically appears on new growth during warm, dry days followed by cool, damp nights. The leaves may curl up, or look badly distorted. You may see tiny black spots amid the white talcum-powder dusting.

What can you do to prevent powdery mildew? Try to plant varieties that are resistant to the disease (for dogwoods, for example, C. kousa is a good choice). Plant roses, for example, in sunny spots, not shady areas that tend to take longer to dry out. Promote good airflow with selective pruning and proper spacing so plants don’t crowd and shade each other out, which encourages spore germination. Remove diseased parts of the plant and destroy all dead leaves (do not compost these clippings) since the fungi can survive the winter. Avoid overhead watering and getting the leaves wet especially late in the day when there’s no time for it to dry.

Cornell University has this good fact sheet on the disease. Researchers have discovered that baking soda combined with a horticultural oil can help fight powdery mildew on roses and other plants. Spray your plant about once a week with a solution of baking soda (1.5 tablespoon/gallon) and horticultural oil (3 tablespoons/gallon).

Filed under: Seattle Landscape Maintenance | | No Comments

What to do about earwigs

Posted on June 17th, 2009 by Phuong

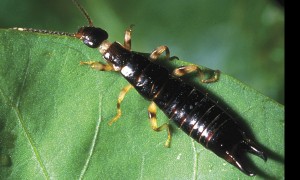
The June pest of the month is the earwig. This is their peak time of the year. earwig11They’re ugly little suckers, and distinctive in their look: dark brown long body with light brown legs and forceps at the rear. (Those pincers are harmless to humans). They’re nocturnal pests, so they come out at night. During the day, they tend to hide in moist, cool shady spots, including under leaves, garden pots, wood or compost piles, mulch. Some feed on aphids, insect eggs and mites, which is beneficial, but they also tend to snack on seedling plants, fruit crops such as strawberries, and flowers such as dahlias, zinnias and marigolds. You’ll find tiny irregular holes in the leaves, or you’ll notice that the leaves have been chewed around the edges.

How do I get rid of them? Trap them. Set out several homemade traps in your yard. One suggestions is to fill an empty tuna can (or other shallow can) with about 1/2 inch of vegetable oil. When the earwigs fall into the oil, empty the cans, refill with oil and set it out again. Another option is to use a moistened rolled-up newspaper or short piece of rubber hose. Put them out before dark and when you get catch some earwigs, shake them out into a pail of soapy water.

Try to eliminate areas where earwigs like to hang out. That means making sure you don’t have piles of yard debris, leaves, wood or other hiding places, especially near your vegetable beds.

Filed under: Seattle Landscape Design,Seattle Landscape Maintenance,Vegetable Gardening | | No Comments

Tips for growing herbs

Posted on June 9th, 2009 by Phuong

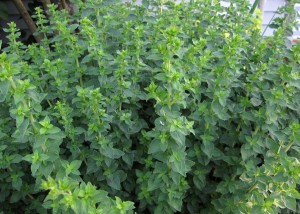
Growing herbs indoors or outdoors is one of the most economical benefits of having a garden. Some herbs are no-brainers, like rosemary, Italian parsley, oregano and mint, because they require very little attention and buying sprigs of those herbs can be expensive. Other herbs such as basil and cilantro are a bit more finicky, but not impossible.

oregano

oregano

Most herbs require some amount of pinching/pruning to keep them full and happy. Make it a regular part of your harvest and it won’t seem like work at all. I regularly cut back rosemary, mint, parsley and basil as I need it, but sometimes even when I don’t. I want to keep the plants full and bushy.

Rosemary, thyme, sage, oregano and savory can tolerate dry conditions. They’re also great low-maintenance plants for your landscape because they require little water. Basil, lemon balm, dill need a bit more moisture. Mint likes wet soil, and should be planted in containers to prevent them from taking over your garden.

Here are some other tips to growing herbs:

Basil: Likes sun! Pinch out stems to create side shoots, and encourage full, bushy growth. Keep the plants well picked. When flowering starts, pinch off each flowering shoot and the leaf pair directly below. This Oregonian article has a good illustration of where to cut.

Cilantro: Perfect herb for Northwest climates because it doesn’t like hot weather. Cilantro prefers cool but sunny conditions. Too hot and it bolts (flowers). The flowers produce coriander seeds, which are also used in cooking. I seeded some a few weeks after I planted my peas earlier this spring, and have periodically re-seeded it with good success. Great for that guacamole!

Parsley: This herb is easy to grow from seed, but are readily available as starts.

rosemary

rosemary

Regularly prune parsley and don’t allow them to go to seed. Trim large stems every so often.

Rosemary: A must have in the northwest.  Regularly prune rosemary, cutting off about a quarter or so, to prevent the plant from growing woody. Rosemary loves full sun, and can tolerate dry conditions nicely. In my opinion, you can’t prune rosemary too hard.

Filed under: Seattle Landscape Design,Seattle Landscape Maintenance,Vegetable Gardening | | 1 Comment

White foam on plants?

Posted on June 7th, 2009 by Phuong
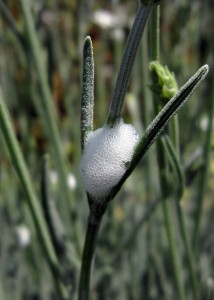
spittlebug foam on lavender

spittle bug foam on lavender

If you’ve noticed frothy white foam on your plants around this time of year, it’s a sure sign of spittle bugs. Spittle bug nymphs hide (and feed) under the foam for protection.

We’ve spotted some on lavender and rosemary in our garden in recent weeks. Don’t worry. They’re not pretty to look at and the bugs do suck some plant sap, but they’re not particularly harmful to your plants.

How do you get rid of it? You can hose the foam (and nymphs) off with a strong spray from your garden hose, or hand pick the nymphs and destroy them. Or you can leave them alone, since they tend to disappear in a few weeks. You tend to see spittlebugs in the Northwest around May and June.

Filed under: Seattle Landscape Maintenance | | 2 Comments

Organic weed control

Posted on June 5th, 2009 by Phuong

One of the most common questions we get from clients is how to get rid of weeds without using pesticides. If only there was a magic wand that allows you to sweep it over weeds and make them disappear. Too bad there’s not. But there are many ways to keep up with weeding so it doesn’t take the joy out of gardening. ipm1007dandelion02

1. Hand pull weeds when they’re young and don’t allow them to go to seed. Pull them in the winter and spring time and keep at them throughout the summer.

2. Where possible, mulch your landscape beds to keep weeds down. A thick layer of bark mulch, applied once a year, will work miracles.

3. Build good soil underneath lawns to help crowd out weeds. If you spend time properly establishing your lawn, the grass will grow thickly and help prevent seeds from germinating. Weeds, however, are inevitable, but you can prevent many of them in your lawn by properly watering your lawn, mowing it frequently (and high) and keeping it fertilized. Avoid weed and feed products that simply broadcast herbicides over the entire lawn. It’s overkill. Rather than directly targeting a specific weed, it “sprays” the entire lawn with the stuff. All of this washes into our drains and into the Puget Sound. If you hand-pull large weeds, be sure to fill in the gaps with a mixture of compost and grass seed. This prevents weeds from filling in the space.

4. Use cover crops (crimson clover is one of our favorites) to fill empty spaces during the winter where you’re not growing anything. Cover crops, also called green manure, build healthy soil.

5. Fertilize and water plants directly and avoid areas where you’re not growing plants.

Filed under: Seattle Landscape Maintenance,Seattle Lawn Care | | 3 Comments

Sheet mulch to shrink your lawn

Posted on June 4th, 2009 by Phuong

Since moving into my West Seattle house five years ago, I’ve been on a mission to reduce the amount of lawn on the property. My goal was to get rid of about two-thirds of the lawn, leaving only a small area in the front of the house and the side yard for the dog. A quick way to get rid of lawn is to rent a sod-cutter, cut up the sod and haul it away. But this can get expensive, especially if you have a large-sized lawn. Sheet mulching is a cheaper alternative though it requires more time and patience. It’s great for controlling weeds, improving soil and getting rid of grass. The idea with sheet mulching is to kill the lawn (and any weeds) by putting down an organic weed barrier that breaks down over time while keeping sunlight out. After about six to nine months, you’ll have a rich soil that you can plant in.

Here’s a step-by-step guide to sheet mulching

Step 1: Mow the lawn as short as possible.

Step 2: It helps to add compost or chicken manure to the lawn to help jump start the decomposition process before you lay down your weed barrier. The high nitrogen in the compost or manure will help build good soil.

Step 3: Soak the area with water.

Step 4: Put down your organic “sheet mulch,” or a weed barrier that kills the lawn and weeds and prevent weed seeds from germinating. You can use several layers of newspapers, cardboard boxes or burlap bags. Make sure to lay down several layers of whatever material you use and overlap them so there’s no gaps where weeds or grass can push through.

Step 5: Add a thick layer of compost, grass clippings or leaves over the weed barrier, about three inches thick. Many people skip this process altogether, but I personally think it’s worth the time and trouble. If you do it right the first time, you’ll have rich soil that you won’t need to fuss with later on.

Step 6: Add a layer of top dressing such as leaves, wood chips, bark or sawdust, about three inches deep.

Step 7: Wait for time and earthworms to do the work. Over time, this top layer will break down with the other layers beneath it, and you’ll have rich, loamy soil. If you’re anxious to plant, you can cut a hole in the weed barrier (newspaper or cardboard).

We have sheet mulched large areas of our planting strip (the no-man’s land between the sidewalk and street) and front lawn with great success. It took about six months to a year before things really broke down, but we were slowly able to add plants to our landscape beds by digging through the layers. Our entire side yard, about 600 square feet, was sheet mulched a couple years ago, and is now the site of a rich, productive vegetable garden.

Filed under: Seattle Landscape Maintenance | | 1 Comment

Gardening calendar: June

Posted on June 1st, 2009 by Phuong

1. Pull weeds. Pull weeds. Pull more weeds.

2. Plant vegetable seeds for a harvest into fall and even winter. Replace plants that have bolted with summer crops such as peppers and tomatoes.pjm2_600px

3. Make sure newly planted or transplanted trees and shrubs are getting enough water. Check plants that you’ve planted within the last few years. Give plants enough water to wet the root zone; water deep but less frequently. Make use of your rain barrels to help you conserve water while keeping your plants well-tended. Water container plants regularly, and fertilize them every four weeks or so.

4. Mow the lawn regularly, and don’t allow the blades too grow too long.

5. Plants are actively growing during this month, so be sure to take the time to enjoy them. Peonies, irises, rockroses, and rhododendrons are going strong right now.

6. Put out your tomato plants if you haven’t already done so. Be sure to prune the lower leaves to keep water from splashing on them. This prevents diseases and other problems.

Filed under: Garden Calendar | | No Comments

Make the most of rain barrels

Posted on May 30th, 2009 by Phuong

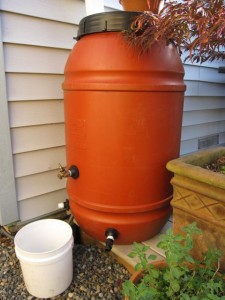
The past week has brought gorgeous sunny weather — even surprisingly high temperatures — to the Puget Sound area. That’s been great for our vitamin D-deprived bodies, but our plants may be feeling the heat. This week has been the perfect time to tap into your 50-gallon rain barrel (hopefully you have at least one installed at your house) to use up the water that you’ve stored from the spring. (For where to buy in Seattle, go to the Seattle Public Utilities Web site; for King County information, check out this site).

Rain barrels allow you to catch rainwater off your roof during rainy days, and to store it to use during dry periods. Seattle rain_barrelrelies on mountain snowmelt for its water supply, so water is precious during summer months (especially if we’ve had less snow than usual the previous winter). Water rates also jump in the summer months, so rain barrels can help you save money and conserve water.

We have two rain barrels that we bought from the city of Seattle and have set up in the backyard to water our non-edible plants. Should you use the rainwater from your roof on plants that you eat? We err on the safe side and use the water exclusively for our non-edible plants. We have plenty of other trees and shrubs to water, and our vegetables are already on an efficient drip-irrigation system.

Over the years, I’ve found that the easiest way to water plants, especially trees, is to buy a few cheap 5-gallon buckets, poke a hole near the bottom of each bucket and set them under the rain barrel to fill one at a time.  Once a bucket is full of water, I’ll set the bucket out near the base of a tree that needs water while another bucket is being filled under the rain barrel. Trees, shrubs and other plants like the slow, deep irrigation that trickels out from the small hole in the bucket. The slow-drip allows the water to seep into the soil more deeply rather than just running off the ground surface or evaporating.

Filed under: Seattle Irrigation Services,Seattle Landscape Maintenance | | 2 Comments

Planting in the strip

Posted on May 12th, 2009 by Phuong

One of our neighbors recently got slapped on the wrist from the city of Seattle for putting inpea-150x1501 some raised vegetables beds in her parking strip without first paying for a $225 permit. She had gotten rid of grass that filled her planting strip — that no-man’s land between the street and the sidewalk — and was getting ready to put in raised beds, when she had to take it down.

Well, there’s good news today for well-intentioned urban farmers who want to make use of their planting strips to grow edibles. Seattle Mayor Greg Nickels announced that homeowners who want to make use of the strip won’t have to pay the $225 permit fee that had previously been required for pavers, hardscapes or planting boxes. You still need to get a permit, but those are free and can be obtained online from the Seattle Department of Transportation.

“This change makes it easier to plant flowers and vegetables in the strip between the sidewalk and the street. For many gardeners, that’s prime space,” said Nickels. “It’s one of the things that makes Seattle special, and, with planting season upon us, it’s time to get those green thumbs going.”

Check out the SDOT web site for more information, including tips on how to make improvements to your parking strip. Read more from Jennifer Langston, a former P-I reporter, who wrote about urban farming in Seattle.

Filed under: Vegetable Gardening | | 1 Comment